The Great Khan Hunt Finale

The site fated for the return of the Khan has been found. The prophecy deciphered. The time has come for the Finale.

If you're reading this, it means it is time to play the Finale of the Great Khan Hunt. The last battle that will determine the outcome of this entire campaign.

This event happens when at least one Coalition is about to achieve its win condition, multiple coalitions have ordered tokens to perform a win-condition relevant order on the tile the Khan is on, or if the Campaign has reached its 6th week.

The Coalitions closest to winning will then be drawn into a conflict at the Khan's location, that is the core of the finale, and play the Final Battle mission. Which the Campaign Master will adjust to suit the scenario.

But if everything is settled by this one mission, what will all the other players do? The other players will be able to play Support Missions. These are missions where you do not score victory points, instead you chose one side to support in the Final Battle, and you fight to increase their chances of winning. Your win condition is that your side wins the Final Battle.

Playing the Final Battle

The Campaign Master will inform each Coalition if they are involved in the Final Battle. This mission can have 2-4 players, depending on which coalitions the campaign master decides can participate. Each participating coalition will then have to nominate one player each to participate in the Final Battle.

The mission follows the Playing a Great Khan Hunt Crusade Mission sequence as normal, but with the following exceptions:

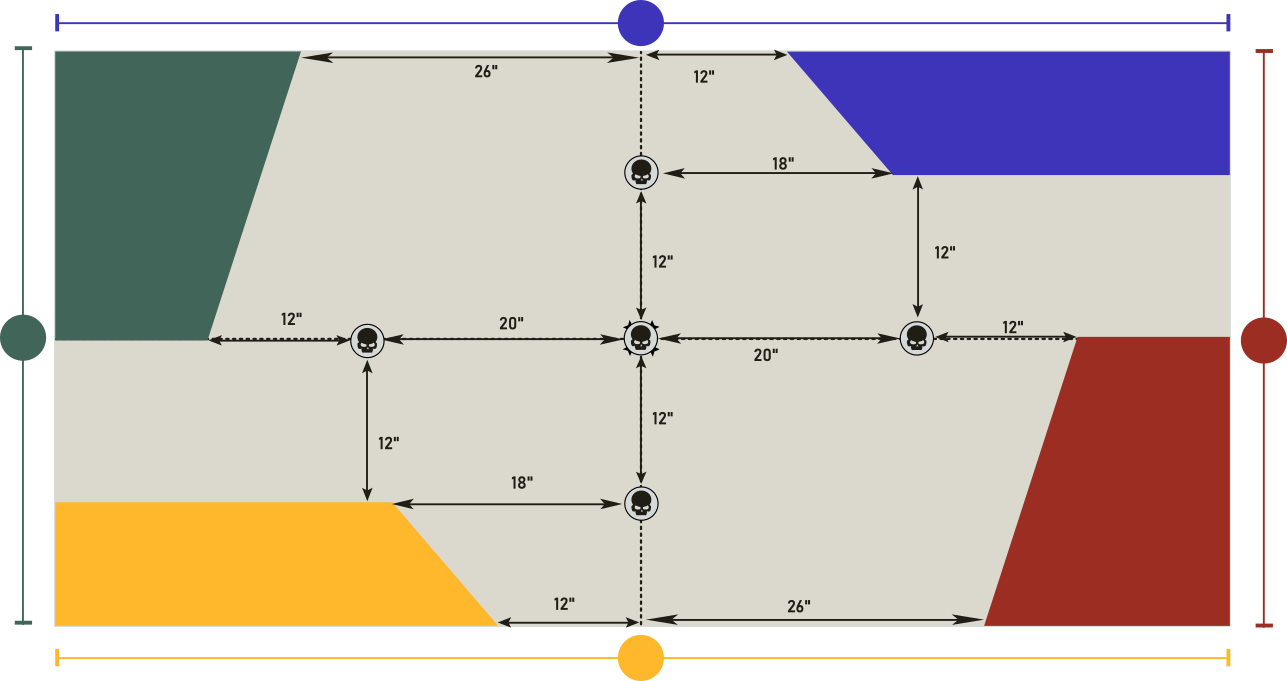
  • The Battlefield is that of an Onslaught battle, but each side muster an army for a Strike Force mission.
  • Each army counts as having an additional Crusade point for every 200 points they muster above 1000.
  • In a 2-player battle, each player alternates selecting deployment zones until each player has two, starting with the defender.
  • If there's 3 or more players, Crusade Blessings are determined by comparing Crusade points with the army that has the highest Crusade points.
  • With 3+ players, players roll off and pick deployment zones in order from highest result to lowest until each player has a deployment zone.
  • With 3+ players, at the start of each round, players roll off, and take their turns in that order, with the fight phase taking turns in the opposite order.
  • With 3+ players, each player only gains a command point at the start of the battle round, and again in their own command phase.
  • The determine mission, and resolve conflict steps are skipped.

Playing a Support Mission

If you want to play a support mission, just follow these steps:

  1. Arrange to play a battle with a player of any other coalition, at the same time as the Final Battle.
  2. Each of you pick a coalition to support in the Final battle. You cannot pick the same coalition, and it is recommended you support a coalition that actually partakes in the Final Battle.
  3. Follow the steps of Playing a Great Khan Hunt Crusade Mission, but with the following exceptions:
    • The battle has to be Incursion or Strike Force.
    • Missions are picked from the following Support Missions table instead of the normal Great Khan Hunt Missions.
    • Roll on the Biome table for which biome rule the mission uses
    • Instead of the victor being the player with the most victory points, the winner is the player that supported the coalition that wins the Final Battle.
    • Skip the Resolve Conflict Step.
Support Missions Biome
D6 Mission D6 Biome
⚀⚁ Comms Tower Bridge
⚂⚃ Lunar Artillery Desert
⚄⚅ Forcefields Mountain
Steppe
Tundra
Volcano

Missions

Mission action rules can be found in the Mission Sequence.

The Final Battle

The time has come to settle the war on Corusil V once and for all. Will the Primarch be returned to the Imperium? Will he be taken? Will he be slain? Will he escape?

Mission Objectives

Capture the Khan
End Game Objective

It is of utmost importance that the imperial forces find the lost primarch, and safely escorts him off the planet.

The forces of chaos were disturbed before they could complete the ritual, but there's still a chance! Take the khan and begin the ritual!

The primarch has unique genetic material the hivemind could make use of.

At the end of the battle, each player scores 15VP for each of the following (to a maximum of 50VP):

  • One of their units found the Khan.
  • If they are the Imperium player and Jaghatai Khan has not been slain.
  • If they are not the Imperium player and Jaghatai Khan was slain by one of their units.
  • Jaghatai Khan is within their deployment zone.
  • They control Jaghatai Khan, either as a unit or as an objective.

And an additional 50VP if the Khan is within 6” of their battlefield edge.

Mission Rules

Find the Khan: All players have access to the following action:

Find the Khan (Action)

Starts: Your Shooting phase.

Units: One or more unit from your army within range of a different objective marker you control that has not been searched yet.

Completes: The end of your turn.

If Completed: That objective marker has now been searched. Roll a D6 for each objective marker you completed this action on, and add 1 to the result for each objective marker that has already been searched. On a roll of 5+, the Khan is found on that objective, and this action can no longer be completed. See the Khan's Arrival rule below.

Khan's Arrival: Once the Khan is found, place the Jaghatai Khan model as close as possible to the objective marker he was found at that is at least 3” away from any other unit. Label each other objective marker the numbers 1-4, and roll a D6. If Jaghatai Khan comes within range of that objective marker, he escapes the battlefield on his own, and the battle ends. On a 5-6, the Campaign Master chooses one.

The Khan is his own unit with the Lone Operative ability, controlled by the Campaign Master, who takes his turns once after the turn where he's found, and at the beginning of each round after that. He does not get Command Points.

The Imperium's player can at the end of their movement phase nominate one unit within 6” of Jaghatai Khan to perform a battle-shock test. On a success, they gain control of Jaghatai Khan as a unit for the rest of the battle, unless he's slain, and no longer takes his own turn.

The Khan has Fallen!: If Jaghatai Khan is slain, don't remove his model from the battlefield. From this point onwards his model is treated like an objective marker. If a player controls this objective marker in the command phase, they can move him up to 6”. This move cannot end on top any models or terrain features.

Victor Bonus

The unit that found the Khan gains 3+D3XP, if its player was the victor.

If the Imperium's player won, they may add Jaghatai Khan to their order of battle, provided this doesn't cause them to exceed their supply limit. Otherwise all their units that participated in this battle gain 2XP.

If Chaos' player won, they can pick one Character unit that partook in that battle to gain one Crusade Relic they are eligible to have.

If the Destruction player won, they gain an additional D3RP.
1-2. Comms Tower

The enemy cannot be allowed to capture the Khan! Take control of this communication tower to sabotage the enemy communications and inform command of their plans! Should all else fail, destroy the tower.

Mission Objectives

Sabotage the Enemy
End Game Objective

While there is glory to be found on the battlefield today, victory is found today by winning the war, not the battle.

The Victor is the player that supported the Victor in the Final Battle.

Mission Rules

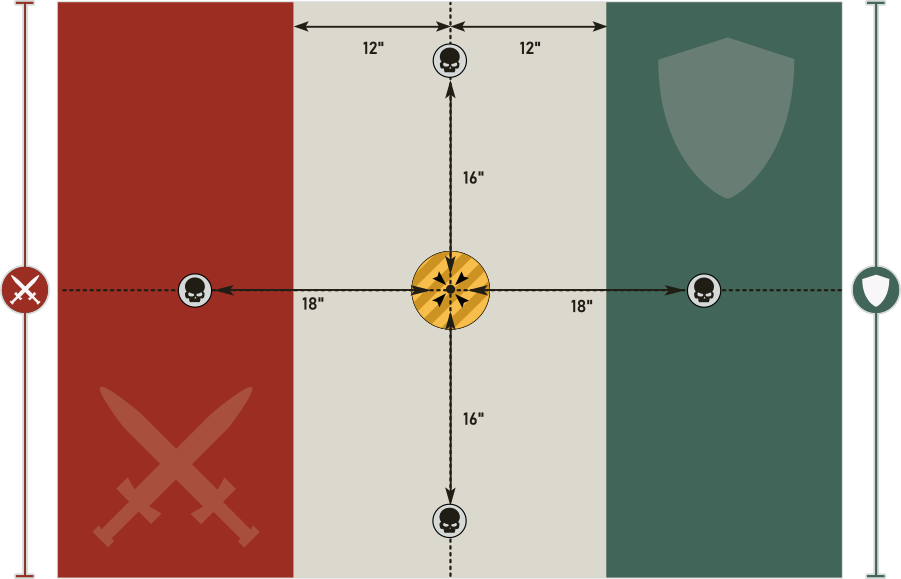
Communications Tower: Place a terrain piece in the centre of the board to represent the Comms Tower. Both players can treat it as an enemy unit that consists of one model. It is treated as a TOWERING FORTIFICATION with 12 wounds, Toughness of 10, and a Save of 3+ (It is recommended that when a player attacks the Comms Tower, the opposing player rolls the saves).

Units within engagement range of the Comms Tower can still be nominated as a target for ranged attack. Models in a unit does not need to take Desperate Escape tests from Falling Back from the Comms Tower while Battle-shocked, except for those that will move over enemy models when doing so.

Units can end normal moves, advances and fall back moves within engagement range of the Comms Tower, but may not nominate it as a target for attacks in the Fight Phase unless they successfully Charged the Comms Tower, or were successfully Charged while within engagement range of it. The Comms Tower is treated as an objective marker, but is controlled by models within engagement range instead of units within 3” of the centre of it.

Hijack Communications: From the second battle round and onwards, if the player whose turn it is control more objective markers than their opponent in their command phase, and the Comms Tower has not been destroyed, the player they support in the Final Battle gain an additional Command Point in their next command phase (Inform the Campaign Master, and they will inform the player you support).

Victor Bonus

The victor gains an additional Requisition Point.

3-4. Lunar Artillery

Powerful artillery has been found on Corusil V's moon, the Indigo Hawk. Seize control of these weapon's platforms and target the enemy before they can reach the Khan!

Mission Objectives

Fire at Will
End Game Objective

While there is glory to be found on the battlefield today, victory is found today by winning the war, not the battle.

The Victor is the player that supported the Victor in the Final Battle.

Mission Rules

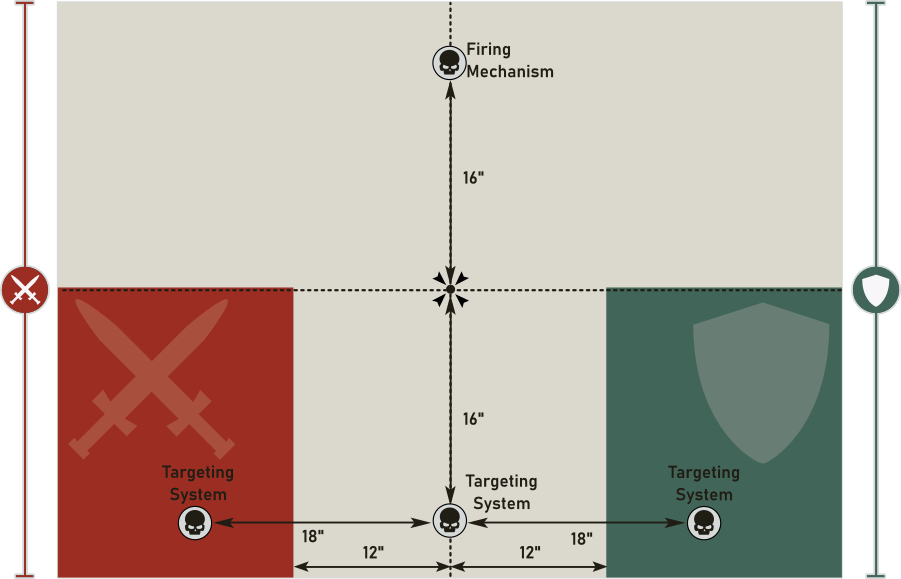
Targeting Systems: One objective marker is the Firing Mechanism, while the rest are Targeting Systems, as marked on the Deployment map.

Lunar Gravity: INFRANTRY and WALKER units can freely move over terrain that is less than 4” in height, instead of 2” in height.

Firing Mechanism:From the second battle round onwards, if a player control more Targeting Systems than their opponent, and control the Firing Mechanism at the end of their command phase, they can Fire the Lunar Artillery. The player they support in the Final battle can make one Lunar Artillery attack in their next shooting phase, as described below (Inform the Campaign Master, and they will inform that player).

Lunar Artillery: These attacks can only target enemy units that are visible from directly above, the target unit only gain the benefit of cover if they are partially obscured by terrain from above. These attacks are made with the following profile:

Ranged Weapons range a bs s ap d
Lunar Artillery - Blast [Blast, Devastating Wounds] n/a d6+3 3+ 6 -1 3
Lunar Artillery - Pierce [Devastating Wounds, Twin-linked] n/a 2 3+ 12 -3 d6+3

Victor Bonus

The victor gains an additional Requisition Point.

5-6. Forcefields

An ancient remote shield generator has been located near the site of the Great Khan. Seize control of the shield generator and protect your allies from enemy fire!

Mission Objectives

Protect your Allies
End Game Objective

While there is glory to be found on the battlefield today, victory is found today by winning the war, not the battle.

The Victor is the player that supported the Victor in the Final Battle.

Mission Rules

Maintain the Polarity: Once per battle, at the start of the battle round, you can choose for the polarity of an objective marker not to shift that battle round.

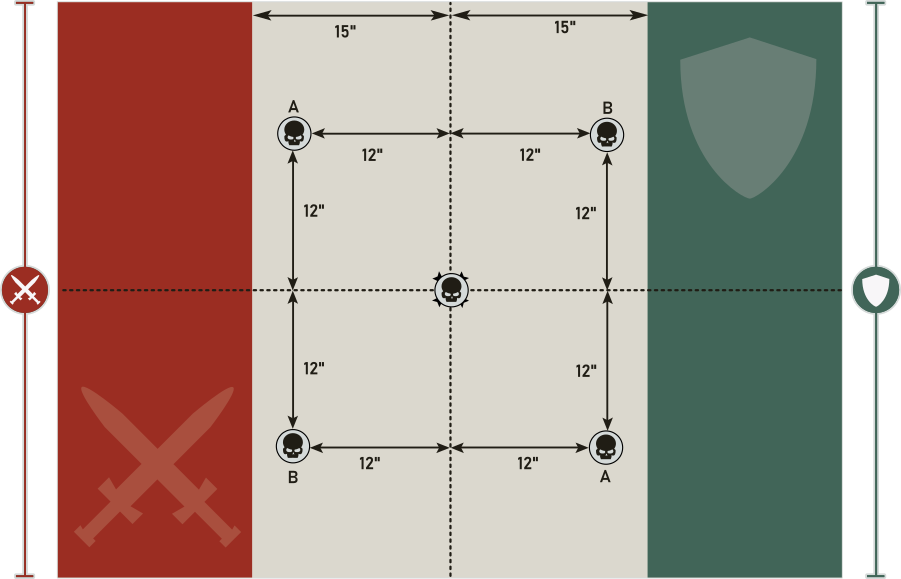
Positively Charged: Objective markers marked A begin the battle positively charged. While a unit is within range of a positively charged objective marker, that unit has the Benefit of Cover.

Negatively Charged: Objective markers marked B begin the battle negatively charged. At the end of the battle round, each unit within range of a negatively charged objective marker suffers 1 mortal wound.

Shifting Polarity: From the second battle round onwards, at the start of the battle round, each objective marker shifts polarity (i.e. positively charged objective markers become negatively charged, and vice versa).

Sheild Allies: From the second battle round onwards, if the player whose turn it is controls more objective markers than their opponent, the player they support in the Final Battle can select one table-quarter, and units they control in that table quarter have a the Feel No Pain 5+ ability until the end of that battle round.

Victor Bonus

The victor gains an additional Requisition Point.

This site was brought to you by Shasskor!